Montag, 31. Oktober 2016

Christmas Series Card #5 / Weihnachtsserie Karte #5 (Exploding Box)

Hallo ihr Lieben!
Heute möchte ich euch meinen fünften Beitrag in meiner Weihnachtsserie und gleichzeitig die Karte für die aktuelle Crafty Cardmakers Challenge zeigen. Das Thema lautet "Farbexplosion" und als ich das das erste Mal gelesen hatte, kam mir sofort die Idee eine Art Regenbogenlich mit weihnachtlichen Motiven aus einer Kiste kommen zu lassen:

Heya my dear crafty friends!
Today I would like to show you the fifth project of my Christmas Card series and also my card for the newest challenge at the Crafty Cardmakers. The theme is "Explosion of Colour" and when I first read this I had an idea in my mind of a rainbow light coming out of a box carrying all kinds of Christmas images with it:


Zuerst habe ich ein dunkles Papier gesucht, damit die Farben richtig strahlen können und bin in einem 6x6 Papierpack "Silver & Gold" von We R Memory Keepers fündig geworden. Das habe ich mit der Wellenrandstanze ausgestanzt und den Spruch darauf in weiß embossed. Als nächstes habe ich die Box aus Kraft-Papier ausgestanzt und zusammengeklebt.

First I looked for a dark paper, so that the colours would really shine brightly and found the perfect one when  I looked through the "Gold & Silver" paper pad by We R Memory Keepers. Using a scallop rectangle die I die cut it to size and also white embossed the sentiment on it near the bottom. Next I die cut the box from kraft paper and glued it together.


Um den Regenbogen passgenau hinzubekommen, habe ich mein Lineal geschnappt und den Abstand der Öffnung der Kiste gemessen. Auf einem rechteckigen Stück Aquarellpapier habe ich nun einen ca. 1 cm hohen Steg in genau der gemessenen Breite mittig unten  aufgezeichnet und bin dann vom Ende der Linien in die jeweiligen Ecken am oberen Rand einen Strich gezogen. Den Bereich, der ein wenig wie eine stummelige Taschenlampe mit Lichtkegel ausschaut, habe ich mit Zig Markern coloriert, nach dem Trocknen mit den verschiedenen Weihnachtsmotiven embossed und dann ausgeschnitten.
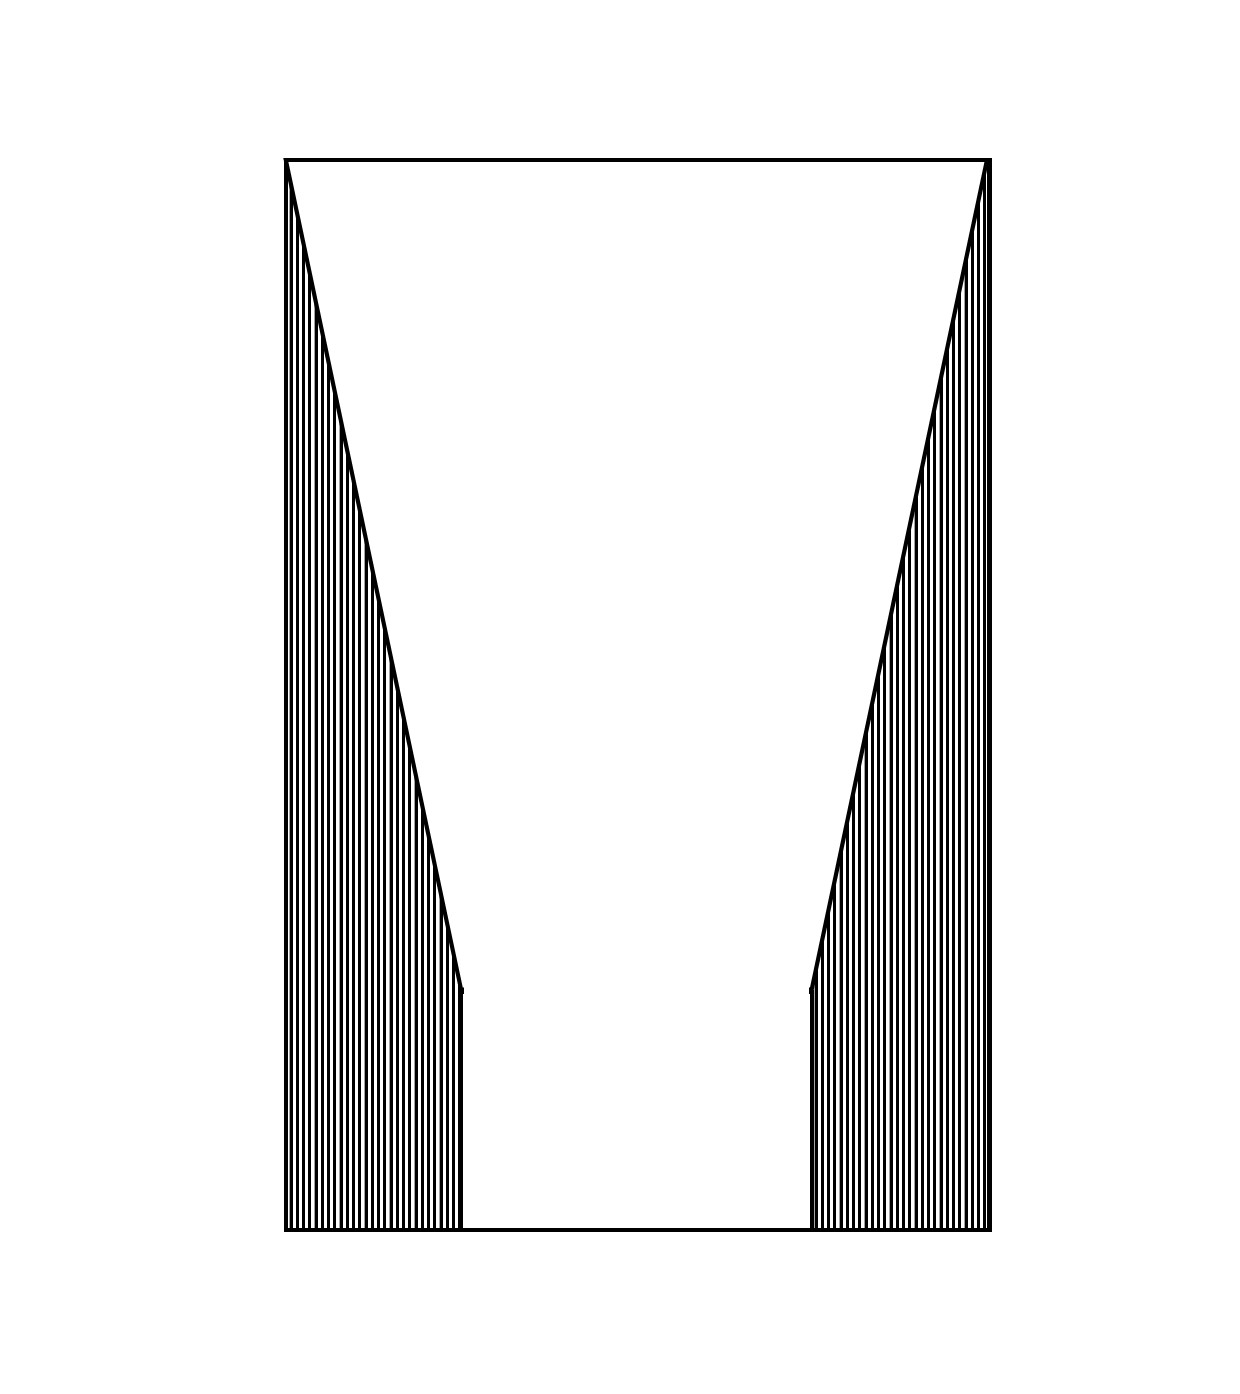
Das Papier für das sollte etwa so aussehen. Der graue Teil muss später weggeschnitten werden. / The paper for the rainbow should look something like this. Cut away the gray area ;o)

In order to have the rainbow at just the right size I took out my ruler and measured the width of the opening of the box. I drew a land (I hope that this is the correct word - I couldn't really find a translation for the word "Steg" that seemed to be a 100% fit...) of the same width as the opening of the box at the bottom of a rectangular piece of watercolour paper. From the end of side of the land (?) I drew a line to the according top corners. I coloured the area, that looks like a very, very short torch with the cone of light coming out of it, in rainbow colours with Zig markers, heat embossed the Christmas images in white over it, once everything was dry and cut it out. 


Das Regenbogenstück habe ich mit der gleichen Stanze, die ich für das schwarze Papier benutzt habe, durch die Big Shot geschickt, damit der Rand oben übereinanderpasst. Die Box inklusive Lichtexplosion habe ich über dem Spruch festgeklebt und mit zwei weiteren Wellenrechtecken habe ich dann die Rückseite der Karte gebastelt. (Wie das geht, habe ich hier beschrieben: klick) Fertig ist die Karte und ich muss sagen, diesen schwarz-bunt Look finde ich richtig gut - sieht so modern aus... Was meint ihr?

I used the same scallop rectangle die on my rainbow piece as I had done to cut the panel, so that the top would match. I adhered the coloured piece to the box first and then added both to the black paper above the sentiment. Using two more die cuts of the same scallop rectangle in white I created the back of the card. (I have explained how that works in a little more detail in this post: click) And my card was done. I have to say I really love this black- multi coloured look - looks kind of modern... What do you think?

Material / supplies:
Stempel / stamps: "Holiday Marquee Sentiment Set" von Purple Onion Designs
                            "Fall into Christmas" von Sweet Stamp Shop
                            "Baaah Humbug" von Lawn Fawn
Stanzen / dies: "All Prettied Up" von Mama Elephant

Challenges:

Sonntag, 30. Oktober 2016

Happy Halloween - Cat with pumpkin

Hallo ihr Lieben!
So kurz vor'm 31. zeige ich euch nun die vorerst letzte Halloweenkarte. Aber ich konnte nicht anders... Dieses süße, leicht verschreckte Kätzchen und die Maus im Kürbis mussten einfach noch auf eine Karte ;o)

Heya my dear crafty friends!
We are very close to the end of October, but I would love to share one more Halloween card with you today. This cute, slightly scared looking cat and the mouse in the pumpkin simply had to be on a card ;o)


Angefangen habe ich damit, die Katze nebst Kürbis und Mäuschen zu colorieren und sie auszuschneiden. Dass sie recht schnell und einfach per Hand auszuschneiden und zu colorieren sind ist definitiv ein großer Pluspunkt für die Images von Gerda Steiner finde ich. Als nächstes habe ich den Spinnenhintergrund gestempelt und den gewellten Kreis daraus ausgestanzt. Danach habe ich noch einen etwas kleineren Kreis aus schwarzem Cardstock ausgestanzt und beide Teile zusammengeklebt.

I started by coloring and fussy cutting the image. That is definately one thing I really like about GSD stamps, they are quick and easy to colour and also easy to fussy cut! Next I stamped the spider background and I die cut the scallop circle out of it. I also die cut a slightly smaller circle from black cardstock and glued both pieces together.


Auf die Kartenbasis habe ich dann das gestreifte Papier geklebt und mit einem Bleistift markiert, wo die Öffnung sein wird. So konnte ich den Spruch an die perfekte Stelle stempeln ;o) Um die Karte zu beenden musste ich jetzt nur noch alle Teile an Ort und Stelle kleben. Ich hoffe, die beiden Angsthäschen haben euch gefallen! Falls ich morgen Halloween feiert, wünsche ich euch viel Spaß. Falls nicht, genießt den Abend moster- und geisterfrei :o)

I glued a piece of striped paper to the card base and place the window panel on top to mark where the opening was going to end up. That way I was able to stamp the sentiment in just the right spot ;o) To finish the card, all that was left to do was to adhere everything in place. I hope you like the two cute scaredy cats (hehe...) and that you'll have a fantastic Halloween night, if you celebrate Halloween. If you don't have a wonderful monster- and ghostfree night ;o)


Material / supplies:
Stempel / stamps: "Digi from the October/ November Bundle" von Gerda Steiner Designs
                              "Meow-lloween" von Art Impressions
                              "Spider" von Stempelschmiede (retired)
Stanzen / dies: ""All Prettied Up" von Mama Elephant
                       "Stitched Circle Dies" von Simon Says Stamp

Samstag, 29. Oktober 2016

Christmas Series Card #4 / Weihnachtskarte # 4 (Sweet Wishes - Cookie Card)


Halli Hallo ihr Lieben!
Heute möchte ich mit euch meine Umsetzung des Sketches für die aktuelle Challenge auf dem Challenge Up Your Life Blog teilen. Oben seht ihr ja schon die Karte und das hier war der Sketch dazu:

Heya my dear crafty friends!
Today I would like to share with you my take on the sketch for the new challenge over at the Challenge Up Your Life blog. At the top of this post you have probably already seen my card and this is the sketch I used as inspiration:


Als erstes habe ich gedacht, dass ich niemals eine interessante Karte aus einem so klaren und schlichen Sketch machen könnte, aber dann habe ich über die Elemente nachgedacht. Der Streifen im unteren Teil wurde plötzlich zu einer Reihe von irgendwas und dann hatte ich die Idee: eine Reihe Kekse ;o) Wer mag schon keine Kekse, wenn es draußen kalt und usselig wird? Na, seht ihr? Niemand ;o) Also habe ich die Keksdose und eine ganze Menge Kekse gebacken... ähhh gestempelt natürlich und das Banner coloriert. Das Colorieren ging super schnell und auch das Ausschneiden war nicht so wirklich schlimm ;o)

At first I thought that I would never find a way to make an interesting card from such a clean sketch, but then I thought about the strip in the lower half. I started to think of it more as a row than a strip and then it hit me: a row of cookies ;o) Who doesn't love a tasty cookie when it is cold and rainy outside. See? Noone ;o) So I stamped loads of cookies, the cookie jar and also coloured a banner that I had die cut from some white paper. The colouring took almost no time at all and even fussy cutting the images wasn't too bad ;o)


Nachdem ich zwei passende Papiere gefunden hatte - eigentlich war es sogar nur eines, denn ich konnte die Vorder- und die Rückseite nutzen - habe ich sie ausgestanzt und zurechtgeschnitten. Anschließend habe ich die beiden Teile auf ein quadratisches Stück dünnes Papier und das ganze dann auf die Kartenbasis geklebt. Die "Naht" habe ich mit den Keksen und der Dose abgedeckt und Letztere für einen realistischeren Eindruck noch mit meinem Glaze-Pen bedeckt. Dann noch das Banner bestempeln und aufkleben und fertig ist eine schöne, aber schnelle Karte, die sich trotz der Coloration sogar zur Massenproduktion eignet ;o)

After I had found two papers - actually it is just one, but I used the front and the back - I die cut them and cut them down to size, glued them onto a square piece of scrap paper and adhered it to the card base. I covered the seam with the cookies and the jar, added a coat of Glaze pen to give the jar a more realistic appearance and also glued down the banner. That was it - a quick and easy to mass produce Christmas card even with the colouring ;o)

Material / supplies:
Stempel / stamps: "Milk and Cookies" Lawn Fawn 
Stanzen / dies: "Small Stitched Rectangle Stackables" von Lawn Fawn
                         "Tags a lot" von Mama Elephant (banner)

Challenges:

Dienstag, 25. Oktober 2016

Crazy Halloween Witch Magyk Moana

Hallo ihr Lieben!
Für die neue Cards und More Challenge lautet das Thema "Halloween" und ich habe hier eine Karte für euch mit einem Digistamp von unserem Sponsor Rick St. Dennis gewerkelt:

Heya my dear crafty friends!
The new Cards und More challenge starts today and our theme this time is "Halloween". I made a card for you with one of our kind sponsor's image:


Die Karte habe ich recht schnell zusammengestellt... - nachdem ich fertig war mit dem Colorieren allerdings. Diese leicht crazy aussehende Hexe is super und ich fand es großartig sie mit den "Farben zum Leben zu erwecken", aber das Bild hat viele kleine Details und man benötigt daher ein wenig Zeit und Geduld fürs Ausmalen.

The card was put together very quickly.... - after I had finished the colouring, that is. This crazy looking witch is awesome and I loved bringing her to life, but the image has loads of little details that take a little bit of time to colour.


Den Hintergrund habe ich mit Hilfe einer Technik gestaltet, die ich auf Pinterest gefunden habe (klick), die mit der Blenderflüssigkeit diesen Blaseneffekt gibt. Zum Glück habe ich dieses Mal daran gedacht eine oder besser diese Technik zu verwenden bevor ich angefangen hatte die Hexe auszumalen. Das ist wichtig, denn hätte ich sie schon ausgemalt gehabt, wäre der Effekt sicher nicht so schön geworden, weil ich mich von "ihr" hätte fern halten müssen. So konnte ich  den Hintergrund malen, wie ich es sonst auch immer mache, nämlich von hell (am Image) nach dunkel (Richtung der Ränder) und bedenkenlos Blender über sie drüber tropfen lassen ;o) Mit verschiedenen Werkzeugen  (Bleistiftende mit Radiergummi, einem Prägestift mit Kugelende und einem Papp"stift" zum Verblenden von Bleistiftfarben) habe ich dann die Flüssigkeit aufgetragen und so die unterschiedlich großen und intensiven Blasen erhalten. Wenn ihr die Technik auch so klasse findet wie ich, solltet ihr euch unbedingt mal das kurze Tutorial ansehen.

The background was created with a technique I found on Pinterest (click) using the blender fluid to achieve a bubble effect. Fortunately I had thought about it, before I had coloured the witch! Otherwise it would have looked blurry as well. What I did was to colour the violet background as I usually would going from light (near to the image) to dark (towards the edges) Before I had coloured anything else I put various sizes of drops of the blender fluid on the background using the back of a pencil, a stump for blending pencils and also a scoring tool with a ball-end. If you like this technique you should definately check out the tutorial.


Ich hoffe, ihr macht mit bei der Challenge und zeigt uns auch eure Halloween-Werke! Happy crafting ;o)

I hope you are going to join us for our current "Halloween" challenge! Happy crafting, everyone ;o)

Material / supplies:
Stempel / stamps: "Magyk Moana" von Rick St. Dennis
                              "Meow-lloween" von Art Impressions (Sentiment)

Happy MEOW-lloween


Hallo ihr Lieben!
Halloween rückt ja immer näher und für die aktuelle PINspirational Challenge haben wir daher ein, wie ich finde sehr passendes, Inspirationsbild für euch: 

Heya my dear crafty friends!
Halloween is just around the corner and so we found a great inspirational picture for you for our newest challenge at the PINspirational blog:


Auf dem Stempelmekka hatte ich, ohne es zu wissen, den perfekten Stempel für dieses Inspirationsbild erstanden und wollte ihn auch unbedingt benutzen. Zuerst habe ich die Katzen und die Kürbisse mit meinen Zigs (die ich immer mehr liebe...) coloriert.

I had bought the perfect stamp for this inspiration at the fair I went to in September, so I was looking forward to using it. First I stamped and coloured the cats and the pumpkins with my zig markers, which I love more every day. 


Dann ging es an den Hintergrund. Der Erdboden hat mir nicht so viel Sorgen gemacht, weil der ja nie gleich aussieht und man deshalb nicht viel verkehrt machen kann. Den Himmel fand ich deutlich schwieriger und bin auch noch nicht 100%ig mit dem Ergebnis zufrieden. Vermutlich hätte ich das Motiv mit einem Masking Fluid schützen und dann schneller und großflächiger drüber malen sollen, (aber damit habe ich bisher noch nie so richtig gute Erfahrungen gemacht) und / oder einen dickeren Pinsel benutzen sollen. Nun ja, ich mag den Hintergrund auch so, denke ich ;o) Vor allem die kleinen weißen Sterne, für die ich erst mit Wassertropfen einzelne Stellen aufgehellt habe und später noch in jede davon einen winzigen Punkt Opaque White von Copic getupft habe. 

Afterwards I started on the background. The ground itself didn't stress me too much, because earth can have loads of looks so one can't really make a huge mistake. However, the sky was a lot harder to create and to be totally honest with you I am not 100% happy with how it turned out. Maybe I should have used some masking fluid, so that I could have worked a lot quicker and with bigger strokes (though I haven't had much luck with that kind of masking yet) and / or I should have used a much larger brush. Well, I think I kind of like the background even though it isn't what I had it envisioned it to be ;o) Especially the little stars, for which I had placed some tiny water droplets on the sky part first and dabbed it off with a paper towel after a few moments. Then I added a tiny dot of Opaque White by Copic in the middle of each droplet.


Nachdem alles trocken war, habe ich den Sprich noch in die linke obere Ecke gestempelt und weiß embosst. Da ich der Karte noch etwas mehr Tiefe geben wollte, habe ich sozusagen noch zwei Zusatzteile (nämlich die Katze unten links und die Kappe von einem der Kürbisse) mit ganz dünnem Abstandskleber hinzugefügt. Mit dem Clear Wink of Stella habe ich anschließend alle erleuchteten Stellen bepinselt und den Glaze Pen habe ich sowohl auf die Stiele der Kürbisse, als auch auf die rosa Pfötchenstellen gegeben.

After everthing was dry I added the sentiment to the upper left corner. I wanted to give the scene even more dimension so I  added two extra pieces (the cat in the lower left corner and the cap from one of the pumpkins) to the image using a very thin foam tape. As some finishing touches I also added Clear Wink of Stella to all the lit up parts of the pumpkins and Glaze pen to their stems and to the pink parts of the cats' paws.

Material / supplies:
Stempel / stamps: "MEOW-lloween Set" von Art Impressions
                              "Chevron Background" von My Favorite Things (retired)
Coloration: Zig markers

Montag, 24. Oktober 2016

Christmas Series # 3 / Weihnachtsserie #3 (Male card / Karte für einen Mann)

Hallo und willkommen zum dritten Teil meiner Weihnachtsserie ;o)
Heute möchte ich euch eine Karte zeigen, die zwar glittert, aber trotzdem auch für einen Mann geeignet ist:

Heya and welcome to part three of my Christmas Series ;o)
Today I would like to share a card with lots of shimmer on it with you, that is still suitable for a man as well as all of us glitter-loving gals:


Wie man in dem Bild oben zumindest erahnen kann, gibt es um Santa und den Spruch herum jede Menge glitzernden Schnee und auch die Schneeflocken lassen sich nicht lumpen und strahlen um die Wette. Da das restliche Design aber sehr CAS ist, finde ich, ist es dennoch eine klasse Männerkarte ;o)

As you can see a little bit in the picture above, there is lots of glittery snow around Santa and the sentiment and those snow flakes glitter as well, but because the card is otherwise very CAS I feel it does make a perfect male card ;o)


Spruch und Santa habe ich auf weißes Papier gestempelt und anschließend mit meiner Tag-Stanze ausgestanzt. Coloriert habe ich mit Copics. Als nächstes habe ich ein Hintergrundpapier in einem Graublau ausgewält und es auch für die Lochverstärkung oben am Tag noch einmal verwendet, um das Papier mehr in das Design einzubinden. 

I stamped Santa and the sentiment on a white piece of paper and die cut them both out with a tag die. The coloring was done using Copic markers. Next I chose a paper for the background in a greyish blue and used the same design for the piece at the top of the tag as well.


Das schwarzweiße Bäckergarn bildet eine tolle Einheit mit dem schwarzen Stempelabdruck und dem Spruch. Als ich das Tag aufgeklebt hatte, war mir die Karte ohne Verzierung auch für einen Mann im Hinterkopf zu eintönig. Deshalb habe ich einfach noch drei Schneeflocken aus silbernem Glitzerpapier ausgestanzt, aufgeklebt und noch um Santa herum etwas glitzerigen Pulverschnee in Form von Stickles Kleber verteilt. Das war, was mir noch gefehlt hatte ;o) Ich hoffe, euch gefällt die Karte, ich jedenfalls liebe diesen knuffigen Santa und könnte ihm pausenlos in die Wangen kneifen, weil er so süß grinst! Habt einen guten Start in die Woche und happy crafting!

I used black and white twine for the tag, because it worked well with the outline of the stamp and the sentiment. After I had glued down the tag I felt that the card was a little too empty, so I decided to add three little glittery snowflakes to the background and some glitter-stickles glue around Santa. That was what I felt had been missing before and now I am calling my card done ;o) I hope you like the card. Have a great start for (or into?) your week and happy crafting!

Material / supplies:
Stempel / stamps: "Snow Angel" von Gerda Steiner Designs
Stanzen / dies: "Tags a lot" von Mama Elephant
                         "Stitched Snowflakes" & "Small Stitched Rectangles" von Lawn Fawn
Papier:

Challenges:

Samstag, 22. Oktober 2016

Christmas Series # 2 / Weihnachtsserie # 2 (Snowangel Tags / Schneeengel Anhänger)

Halli Hallo ihr Lieben!
Am zweiten Tag meiner Weihnachtsserie möchte ich euch drei Tags zeigen, die ich mit dem Snow Angel Set von Gerda Steiner Designs gebastelt habe. Die Motive sind einfach zu süß und lassen sich schnell colorieren, also dachte ich, sie würden sich super gut als Geschenkanhänger machen. Ich bin ehrlich, ich liebe Geschenkanhänger, aber sie landen noch eher als Karten unbedacht im Müll und da möchte ich nicht Stunden in eine aufwändige Coloration stecken, aber trotzdem ein gutes Ergebnis haben. Dazu eignen sich diese niedlichen Weihnachtsmotive sogar sehr gut, finde ich. Natürlich eignen sie sich auch wunderbar für Karten, aber das zeige ich euch einfach in einem zukünftigen Post ;o)

Heya my dear crafty friends!
On the second day of my Christmas series I would like to share with you these three tags which I have made using stamps from the new "Snow Angel" set by Gerda Steiner Designs. The images are really cute, but they are also easy to colour, so I thought they would make perfect gift tags. I do love gift tags, but they find - even quicker and more often than cards - their way into the trash and so I don't want to spend hours on colouring, yet get a nice result. I think, these images are just perfect for tags, though they do look great on cards, too. (But I will show you that in a future post.) :o)
 

Ich habe die süßen Schneeengel und den Spruch gestempelt und dann jeweils mit der Tag-Stanze ausgestanzt. Anschließend habe ich für jeden der drei Anhänger einen roten und sechs weiße Rahmen ausgestanzt, um genug Höhe für den Shakerteil zu bekommen. Für das Plastikteil habe ich noch einmal die gleiche Stanze benutzt, wie für die Motive, damit der Schlitz für das Band an der richtigen Stelle ist und ich nichts mehr zurecht schneiden musste.

I stamped the three cute snow angels along with the sentiment (Merry Christmas) and die cut them each with a tag die. Next I cut one red and six white frames for each tag, to give the shaker part enough height, so that the filling can move. I used the same die that I had used for the image for the plastic piece as well, so that I wouldn't have to cut it to size with my scissors and also so that the slit for the ribbon would be at the right place.

  
Ich habe ein paar klare Kügelchen und supersüße hellblaue Sternchen (die ich von der lieben Nina auf dem Stempelmekka bekommen habe) eingefüllt und schnell alles zusammengeklebt. Dann musste ich nur noch das Band oben durch den Schlitz durchgefädelt werden und fertig waren die Tags. Ich persönlich finde immer, dass ein Geschenkanhänger die Verpackung wundervoll abrundet und die Vorfreude noch etwas mehr steigert. Bei uns liegen die Geschenke immer eine Weile unter dem Baum und meine kleine Nichte hat allein schon Spaß dran alle Tags zu bestaunen. Wie sieht es bei euch aus? Habt ihr Tags an euren Geschenken?

Das war der zweite Tag meiner Weihnachtsserie 2016 ;o) Falls ihr den ersten Post verpasst habt, verlinke ich ihn euch noch einmal hier (klick), denn dort gibt es nicht nur eine moderne, bunte Weihnachtskarte für euch, sondern auch noch meine Weihnachtsserien-Verlosung eines 24 Euro Gutscheines ;o)

I filled some clear beads and uber-sweet tiny blue stars (which I got from the lovely Nina at the Stempelmekka this year) into the shaker area and quickly glued the pieces together. Now all that was left to do was to fiddle the ribbon in place and the tags were done. I personally think that a gift tag adds even more to a nice wrapping and enhances the pleasant anticipation a lot. In our home the Christmas presents are placed beneath the tree a while before it is time to open them and my cute little niece loves looking at all the colourful tags. How about you? Do you put tags on your presents as well?

This was the second day of my Christmas series 2016 ;o) In case you have missed the first one I will link it up for you right here (click), because you do not only find a modern colourful Christmas card there but also my Christmas series give-away of a $24 gift certificate ;o)

Material / supplies:
Stempel / stamps: "Snow Angel" von Gerda Steiner Designs
                           "Fröhliche Weihnachtszeit" von Klartext
Stanzen / dies: "Blueprints Tag-Builder 5" von My Favorite Things

Donnerstag, 20. Oktober 2016

Christmas Series 2016 Card #1 / Weihnachtsserie 2016 Karte #1 (Colourful Christmas)

Halli Hallo ihr Lieben!
Endlich ist es soweit: Meine Weihnachtsserie 2016 startet heute und ich möchte euch bis Heilig Abend 24 Weihnachtskarten - und / oder Projekte zeigen. Dabei werde ich zwischen schnellen und aufwändigeren, traditionellen und modernen Basteleien zu wechseln, so dass hoffentlich für jeden etwas dabei sein wird ;o) Und diese hier macht den Anfang:

Heya my dear crafty friends!
Finally it's there: My Christmas Series 2016 starts today and I would like to show you 24 projects and cards until the 24th of December. I will vary between quick and easy cards and those that take a little longer and also between more traditional ones and more modern designs, so that hopefully each of you will find something you like. And here is the card #1:


Ich wollte mit einer fröhlichen, bunten Weihnachtskarte beginnen und habe deshalb sechs Weihnachtsbäumchen ungefähr in Regenbogenfarben coloriert und sie ausgeschnitten. Als nächstes habe ich mich um die Kartenbasis gekümmert. Dazu habe ich eine Schneeflocken-Schablone von Create A Smile herausgesucht und die Flocken mit einem hellen Blau aufgetupft und zusätzlich noch einen rosa Streifen am unteren Rand hinzugefügt.

I wanted to start with a cheerful, colourful Christmas card, so I coloured the trees in 6 different colours, roughly following a rainbow pallette, and fussy cut them out. Next I prepared a card base and added some interest to the background by sponging on some light blue ink through the snowflake stencil by Create A Smile as well as by adding a strip of paper to the bottom.


Als nächstes habe ich die Bäume direkt auf die Karte geklebt und den Spruch drum herum gestempelt. Zum Schluss habe ich noch alle Sterne mit einem goldenen Stift zum Glitzern gebracht und die beiden oberen Ecken abgerundet. Das war die erste Karte meiner diesjährigen Weihnachtsserie und ich hoffe, sie gefällt euch ;o)

Next I adhered the trees directly to the card front and stamped the sentiment around it. As a finishing touch I added gold sparkle to the stars on top of the trees and rounded the top corners. That was the first card for my new Christmas Series and I hope you like it. ;o)


GIVEAWAY:
Letztes Jahr gab es ja schon mal eine Weihnachtsserie und da sie mir so viel Spaß gemacht hat, habe ich mir gedacht, ich stelle auch dieses Jahr eine auf die Beine. Zu der Serie gehörte auch eine Verlosung und die soll natürlich dieses Mal auch nicht fehlen ;o) Ich bekomme hier und auch auf den anderen sozialen Kanälen so viele Kommentare und liebe Worte von euch und dafür möchte ich mich mit diesem Giveaway bei euch allen bedanken.
Was kann man gewinnen???
Einen $25 Gutschein für einen Online-Bastelshop eurer Wahl.
Wie kann man gewinnen???
Gewinnberechtigt ist jeder, der meinem Blog über Google Friend Connect oder Google+ folgt und bei mindestens einer Karte der Weihnachtsserie 2016 kommentiert. Für jeden Kommentar zu einer meiner Karten der Weihnachtsserie kommt ein Los für euch in den Lostopf (ein Los pro Post).
Zusätzlich kann man dieses Mal auch auf Instagram am Gewinnspiel teilnehmen. Folgt mir einfach auf Instragam (@maikreations), liked den Post zum Gewinnspiel und hinterlasst mir dort einen Kommentar. Zusätzlich könnt ihr Lose erhalten und die Chance auf den Gewinn erhöhen, wenn ihr in den Kommentaren auf Instagram bastelinteressierte Freunde tagged und ihnen so von meiner Weihnachtsserie berichtet.
Am 27.12.2016 werde ich den Gewinner oder die Gewinnerin ziehen und auf meinem Blog und auf Instagram veröffentlichen. Der Gewinner / die Gewinnerin hat bis zum 31.12.2016 sich bei mir zu melden, ansonsten verfällt sein / ihr Gewinn und ich ziehe am 01.01.2017 erneut einen Namen aus dem Lostopf.
Ich wünsche euch und mir viel Freude an der Weihnachtsserie und hoffe, dass ich in euch ein wenig den Bastel-Weihnachtsgroove wecken kann, auch wenn es noch recht früh im Jahr ist. ;o) Viel Glück für die Verlosung!

Eure Maike ;o)

GIVEAWAY:
Last year I had started a Christmas Series and because I had a lot of fun making it, I thought I would have one again this year. Along with the Christmas Series I had a giveaway on my blog, just like I will this time around ;o) Many of you take the time and leave comments here or on other Social Media Platforms which I am really very grateful for and I want to say thank you to all of you lovely people out there!
What can you win?
A $25 gift certificate to an online crafting shop of your choice.

What do you have to do to win?
Eligible for the $25 gift certificate is anyone who follows my blog through Google Friend Connect or is a Google+ follower and who leaves at least one comment on one of the posts of my christmas card series 2016. For each comment I will put one token with your name on it into a box (one token per post). 

You can also enter via Instagram this time around. Simply follow me on Instagram (@maikreations), like the giveaway post and leave me a comment. You can also tag your crafty friends who you think might be interested in my series for more entries to the giveaway.
I will draw and announce the winner's name on the 27th of December 2016 on my blog and on instagram. The winner has time to get back to me until the 31st of December 2016. If they fail to do so, they forfeit their prize and I will draw a new winner on the 1st of January 2017.
I hope you all are going to enjoy the Christmas Series as much as I do and maybe I'll spark a bit of Christmas inspiration. Good luck everybody!

Yours Maike

Montag, 17. Oktober 2016

Things that go bump in the Night (Pop-up card)

Halli Hallo ihr Lieben!
Wenn ihr euch jetzt fragt, was dieser Titel bedeuten soll, dann gibt es darauf zwei Antworten: Zum Einen ist es der Titel für unsere neue Challenge bei den Crafty Cardmakers. Das war einfach. Die tatsächliche Bedeutung hat sich mir allerdings trotz gar nicht mal so übler Englishkenntnisse entzogen und ich habe eine Erklärung auf Leo.org gefunden (click), die ungefähr besagt, dass es sich um (Halloween-) Wesen handelt, die in der Nacht ihr Unwesen treiben. Neben Fledermäusen, dachte ich, könnten auch einmal eher halloweenuntypische Tierchen am 31.10. herumgeistern:

Heya my dear crafty friends!
"Things that go bump in the night" is the new challenge theme at the Crafty Cardmakers blog. I have learned that bats, black cats and such are meant with that saying and I hope noone mind that I streched its meaning a little and included some... ummm... scary pigs in costume as well:


Als ich meine erste Pop-up Karte veröffentlicht habe (klick hier) habe ich versprochen meine Erkenntnisse und Lernfortschritte zu dieser Kartenart mit euch zu teilen und das werde ich nach weiteren Versuchen damit nun auch gerne tun ;o) Ganz besonders zwei Erkenntnisse haben mir dabei geholfen diese Karte schneller und mit weniger Knoten im Hirn zu basteln. Die erste war, dass ich viel freier gestalten kann, wenn ich ein quadratisches oder ein Hochformat wähle, da dann die Gefahr geringer ist, dass Elemente aus der Karte herausblitzen.

When I posted my last and first pop-up card (click here) I had promised to write a bit more about the topic in the future, which is what I want to do now ;o) There are two main realisations that helped me to create this card way more efficient than the last one. The first was, that I find it a lot easier to make a square or a portrait card, because then the chance of the added elements sticking out is lessened (hope that is the right word...).


Die andere Erleichterung erfährt man durch dünnes Papier. Innen in meiner Karte habe ich ganz bewusst sehr dünnes schwarzes Papier für die Landschaft benutzt, weil sich die Karte dann immer noch schließen lässt und man nicht auch noch eine Banderole herstellen und ins Design einplanen muss.

The other thing was, to use thin(ner) paper whereever possible. In this case the black paper on the inside of the card has the thickness of normal printer paper, so the card can be closed a lot easier.


Für die Schweinchen habe ich übrigens munter zwei Sets von verschiedenen Firmen gemixt. Die Haare / Kopfbedeckungen aus dem "Booyah" Set von Lawn Fawn passten hervorragend auf die Köpfe von den "Hog Heaven" von MFT und so kam ich zu den verkleideten Piggys.

I used two sets from different companies to dress up the little pigs. The hair and the hats from the "Booyah" set by Lawn Fawn made a perfect costume for the pigs from the "Hogs Heaven" set by MFT.


Vielleicht habt ihr ja auch Lust ein paar Halloweentiere, Geister und verwunschene Häuser zum Leben zu erwecken?! Dann macht doch mit bei der aktuellen Crafty Cardmakers Challenge und verlinkt euer Werk ;o) Happy crafting!!!

Maybe you feel your fingers itch by now and you would like to create a Halloween project as well?! If so then please join us for our current challenge :o) Happy crafting!!!


Material / supplies:
Stempel / stamps: "Hog Heaven" von My Favorite Things
                              "Booyah" von Lawn Fawn
                              "Meow-lloween" von Art Impressions (sentiment)
Stanzen / dies: "Grassy Border" & "Forest Border" von Lawn Fawn
                         "Trick or Treat" von My Favorite Things (boo & bats) / (retired)

Challenges:

Freitag, 14. Oktober 2016

Snowboarding Santa by Gerda Steiner Designs

Hallo ihr Lieben!
Heute habe ich eine neue Karte für euch mit Stempeln von dem neuen Gerda Steiner Designs Release. Ich habe für meine Karte den Weihnachtsmann auf seinem Snowboard und die Schneewehe verwendet.

Heya my dear crafty friends!
Today I would like to share a new card with you using stamps from the newest release by Gerda Steiner Designs. For the card I have used the snowboarding Santa and the snowdrift.


Falls ihr jetzt die Schneewehe gesucht habt, aus der habe ich einfach eine Tanne "gebastelt", weil es aussehen sollte, als würde Santa gerade mit seinem Board springen und ich einen Baum in passender Größe benötigte ;o)

Just in case you are looking for the snowsdrift, I used it a bit differently... I wanted it to look like Santa is jumping with his snowboard, so I didn't need the snowdrift, but I wanted to have a fir tree in the right size, so I used the snowdrift image to create one ;o)


Um den Hintergrund zu gestalten habe ich eine Schablone und weiße Embossing Paste auf rotem Papier benutzt. (Aus irgendeinem mir unerfindlichen Grund scheine ich Embossing Paste beinahe ausschließlich auf Weihnachts- oder Winterkarten zu benutzen und weiß gar nicht so genau warum... Manchmal entdeckt man seltsame Seiten an sich... *grins)

To create the background I have used a stencil and some embossing paste on red cardstock. (For some reason I tend to use embossing paste most often for winter or Christmas cards, though I really don't know why... Sometimes I am just weird like that...*grin)


Falls ihr viele Wintersportbegeisterte Freunde habt oder einfach Menschen kennt, die traditionelle Weihnachtskarten nicht zu mögen, solltet ihr euch das Set (klick) definitiv mal ansehen.

If you have friends who are into winter sports or who don't appreciate traditional Christmas cards as much as modern or fun ones, you should definately go and check out this new set (click).

Material / supplies:
Stempel / stamps: "Sportsy Santa" von Gerda Steiner Designs
Stanze / die: "Cross Stich Rectangle" von My Favorite Things
Schablone / stencil: "Snowflake #3" von Echo Park

Challenges:

Dienstag, 11. Oktober 2016

Best of Luck on your new adventure


Halli Hallo ihr Lieben!
Meine heutige Karte ist auf Grund dieses Inspirationsbilder der neuen PINspirational Challenge entstanden:
Heya my dear crafty friends!
Today's card was made after I had seen this new inspiration picture at the PINspirational blog: 

Auf Grund des neuen Inspirationsbildes habe ich mich dazu entschieden - zugegebenermaßen recht frühzeitig - einer lieben Kollegin, die uns Anfang des Jahres leider verlassen wird, eine Abschiedskarte zu basteln. Sie beginnt an einem anderen Standort ein neues Abenteuer und daher habe ich sofort an das sußer süße Set von MFT gedacht. Ich habe das Mädchen gestempelt, mit einer Maske geschützt und dann noch ein großes Kofferset dahinter gestempelt. Es handelt sich ja schließlich nicht um einen Kurzurlaub, sondern ein richtig großes Abenteuer ;o)

I decided to make a card for one of my collegues who is going to leave us at the beginning of next year. She starts a new adventure and so I thought the MFT set was just perfect for what I had in mind. I started by stamping and then masking the girl, so that I could stamp the set of suitcases behind her as well. 


Ich habe alles, inklusive des Bodens und der Ziegelmauer, mit Copics coloriert; habe aber das Kleid und den Hut weiß gelassen. Für die beiden Elemente wollte ich die Paperpiecing-Technik benutzen, weil ich dachte, dass der jungen Dame ein schönes, schlichtes Muster sehr gut stehen würde. Also habe ich sie erneut auf das gemusterte rote Papier gestempelt, Kleid und Hut ein wenig schattiert und dann ausgeschnitten. Der Schatten geht leider ein wenig unter, weil ich vergessen hatte, dass feuchte Farbe ja immer dunkler ist, als dann, wenn sie getrocknet ist. Man sieht es noch und ich mag den Effekt, aber ich hätte es mir im Nachhinein doch noch etwas kräftiger gewünscht...

I coloured everything with Copics, including the ground and the brick wall, but kept the dress and her hat white. I wanted to do some paper piecing because I thought a low-key pattern would look great on her. So i stamped the girl again on red patterned paper, shaded her dress, which gets lost a little because I forgot to consider that wet ink is always darker, but I still like the effect very much ;o)


Zum Schluss habe ich eine Banner-Stanze benutzt, um die Szene auszustanzen und habe das dann mit Abstandshaltern auf eine Kartenbasis geklebt, die ich zuvor mit dem gleichen Papier, das ich für das Kleid benutzt hatte, verschönert habe. Schnell kam noch der Spruch und ein paar weiße Enamel Dots dazu, dann wurden die Ecken abgerundet und meine Karte war fertig.

To finish the card I used a banner die to cut the scene out and used foam tape to adhere it to the card base which I had covered with the same patterned paper I had used for the dress. Now I quickly stamped the sentiment, added a few enamel dots and rounded the edges of the card base and my card was done.

Material / supplies:
Stempel / stamps: "Adventure is Calling" von My Favorite Things
                              "" von Ink
Stanzen / dies: "Stitched Jumbo Fishtail Banner" von My Favorite Things
Papier: "Sweater Weather" von Lawn Fawn

Challenges:

Sonntag, 9. Oktober 2016

Ginger Bread Couple

Hallo ihr Lieben!
Heute habe ich noch eine Karte für euch mit Stempeln aus dem neuen Set "Snow Angel" von Gerda Steiner Designs. Ich habe überlegt, wie man die Images noch anders nutzen könnte und da dachte ich an ein Lebkuchen-Pärchen ;o)

Heya my dear crafty friends!
Today I would like to share a card with you using the new set "Snow Angel" by Gerda Steiner Designs. I thought about how one could use the images - apart from the obvious way to have them make snow angels - and decided that two of them would make a really cute gingerbread couple ;o)

Ich habe den Lebkuchen-Schneeengel zwei Mal gestempelt und mit Copics coloriert. Dabei habe ich einen dunkler gemalt, denn der sollte später der Mann werden. Seine Deko habe ich in einem Blaugrün gemalt und das Mädchen hat rote Verzierungen bekommen ;o) Nun war es an der Zeit den beiden ein Plätzchen auf der Karte zu gestalten, also habe ich aus einem gemusterten Papier ein Rechteck und daraus dann einen Kreis ausgestanzt. Auf der Kartenbasis habe ich mit einem Bleistift eingezeichnet, wo später die Öffnung sein würde, damit ich den Spruch zentriert stempeln konnte.

I stamped and coloured two of the cute ginger bread men, colouring one a little darker than the other. That one was supposed to become the male, so I coloured his accents in a teal colour and the lighter one - the girl - got the red accents ;o) Now it was time to give them a place to "sit", so I die cut a rectangle from some patterned paper and die cut a circle from that. I marked down on the card base where the opening was going to be with a pencil and stamped the circle sentiment in place. ("Frohe Weihnachten" is German for "Merry Christmas".)


Als ich das braune Papier über den im Kreis geschriebenen Spruch gehalten habe, ist mir der Hintergrund nun plötzlich sehr hell, fast grell, vorgekommen. Also habe ich mit "Candied Apple" Distress Ink ein klein wenig rote Farbe aufgetragen. Das war direkt viel besser ;o) Um das Papier aufzukleben habe ich Abstandshalter benutzt, um den Effekt des "Fensters" noch zu verstärken, habe einen roten Rahmen hinzugefügt und habe dann das Lebkuchenpärchen in ihr neues Zuhause geklebt. Einen von beiden habe ich direkt auf die Kartenbasis geklebt, den anderen oder besser die andere habe ich wieder mit ein wenig Foamtape hochgestellt. Um etwas rote Farbe auch auf das gemusterte Papier zu bringen, habe ich mir einen roten Copic geschnappt und einzelne Liedteile farbig unterlegt. Außerdem habe ich den roten Rahmen noch ordentlich mit dem Clear Wink of Stella bearbeitet, aber leider sieht man das in den Fotos wieder nicht so gut..

When I placed the patterned paper over the circle again the white from the background felt too bright, so I decided to take some "Candied Apple" Distress Ink and sponge some on the inside of the circle. That was a lot better ;o) I used foam tape to glue the paper to the card base, added a red frame around the window to match the colour on the inside and place the ginger bread couple inside. I glued one of them directly to the card, the other one is raised up with foam tape. In order to bring some red to the patterned paper as well I used a red marker to highlight some parts of the Christmas carol and also used the Clear Wink of Stella Glitter pen to add some shimmer to the red frame. Unfortunately it is really hard to see in the pictures though...


Die süßen Schneeengel - auch wenn sie hier gerade einmal ohne ihre Flügel zu sehen sind - kommen sicher auch noch einmal in meiner Weihnachtsserie 2016 vor, die am 20. Oktober starten wird! Vielleicht habt ihr ja Lust vorbeizuschauen... Natürlich wird es neben den geplanten 24 Weihnachtskarten / -projekten auch noch ein Giveaway geben ;o)

You will certainly see these cute "Snow Angels" again during my Christmas Card Series 2016 which will start on the 20th of October! Maybe you are going to come by for the start of it? There will be 24 cards / projects until the 24th of December and of course there will also be a giveaway ;o)


Material / supplies:
Stempel / stamps: "Snow Angel 4x6 Clear Stamp Set" von Gerda Steiner Designs
                           "Frohe Weihnachten Circle  Stempel Set" von Kulricke
Stanze / die: "Cross Stich Rectangle" & "Stitched Circle Stax" von My Favorite Things
Schablone / stencil: "Snowflake #3" von Echo Park

Related Posts Plugin for WordPress, Blogger...